|
You've done all the work of planning, drafting, and coloring, but then comes the big question. "How do I know when a drawing is finished?" Well, I will say this about myself. I have a problem with fiddling forever on things. About the only way to keep me from it is to frame the artwork! That being said, there does come a point when I know a drawing is ready enough. But how do I know? Here are five steps I make sure are completed before I sign my name to any piece of my artwork. These are not steps I wait to do at the end, but I continually repeat steps 1-4 during the entire process. Once I can confidently answer yes to each I know I'm there!
1.) Does it pass technical inspection? This step is generally completed in the early stages, but I remain aware and check on things through the entire process. You know the saying, "Measure twice, cut once."? Same principle. More measuring means less reworking and correcting! When starting a new piece, I use a grid to initially map the subject, BUT I never rely on it fully to ensure lines are correct. I apply several classical drawing methods to check line accuracy. I use my pencil as a Mondrian tool (for horizontal/vertical lines), as a clock angle tool, and as a tool to measure proportions. Training the eye to really see is really important! 2.) Have I gone the extra mile? I've seen a number of artists who finish the mid-tones in a colored pencil drawing and then mistakenly think it is done. Just because everything is colored in doesn't mean it's completed! The final stage should be to make it pop. Be around me very long and you'll hear, "Make your darks dark and your lights light!" so many times it may drive you crazy! Here is the thing though. Our eyes don't transfer what we see to our brain and then to our paper very well. We lose information which can translate into flat artwork 2D in appearance if we are not vigilant. A good rule of thumb is to make the dark areas a bit darker than we think they should be and the light areas lighter. This will give your art a more 3D appearance. This is one of those times it's okay to exaggerate a little! 3.) Have I let it set a bit? I need to walk away from the easel, as in leaving the room. This might be for a couple hours or overnight. This is because I must 'reset' my eye. I need to be able to come back to it fresh. Basically, I need to forget what my work in progress looks like and not be working on it in my head. This way, when I come back to it, any errors or areas that still need more work will jump out at me more clearly. This step is constantly being done! Always, always be stepping away from your artwork, whether you are just periodically stepping back 10 feet while you are working or leaving the room for a bit. It is really important that your eye can freshen and not allowed to get too focused and stuck in a rut! If you work at a drafting table, consider propping your work up so that you can look at it from a several feet away. When I can walk back in and see the 'art', but not 'work', I know I'm done! 4.) Have I had it critiqued? At different times during the creation of a piece, I will make sure I run it by my toughest critics to see what they think. This is usually family and friends I know will be bluntly honest. Online art groups and forums are great, too! No matter how hard we try to be objective, sometimes it takes another party to spot an error that we've missed or who can offer a suggestion for making it better we hadn't thought of. This can be a little nerve-wracking, but doing this now rather than having something come to light after a piece has been released makes it totally worth it! 5.) Have I cleaned up after myself? Finally, when I'm confident that my subject is technically correct and 'popping' and has passed inspection by the critics, I tidy up by sharping lines that are supposed to sharp and remove any smudges that I may have gotten on the space around the subject (if there is no background). I also make sure any white areas on the subject are still clean and any last minute fine tuning is completed. After I have completed all these steps to my satisfaction, I take a freshly sharpened pencil and sign and date my finished, brand-new original! Notes to take away:
I did not post any pictures with this because there is so much to read, but if you want to view photos of one of my pieces from start to finish you can check out last Wednesday's blog post, From Art to Life.
0 Comments
Note: All reference photos used for my artwork are either my own or my sister's (used with permission, of course), unless otherwise stated. This Wednesday's Work in Progress will be a blog post. To kick things off, I thought I would walk through the process of a completed painting to give you an idea of how I do things. I thought I would use the piece currently on display on the "Easel" page, "Tender Moment", in order to compliment it by giving the behind the scenes of its creation. Descriptions are found under each image. 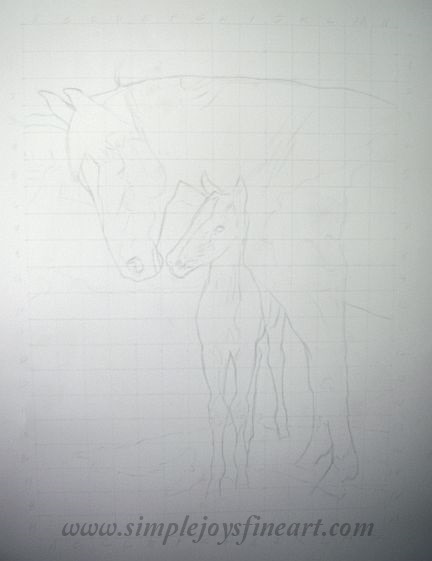 I work from reference photos and it is common for me to graph out the subject onto the paper, particularly with more complex pieces. I mostly just want to lay out the outside lines. I do not do this with charcoal and graphite drawings as I believe in good draftsmanship, but colored pencil involves so many hours of coloring and layering that I don't like to take chances that an error may ruin a piece, such as black shadow being left on white! The image above has had the lines darkened significantly so that you can see them, however, they are put onto the paper very lightly and erased as soon as I have had a chance to block in a bit of color to make sure the technical parts are all correct. Incidentally, this is not my favorite part of the process! I try to rely on my eye as much as I can during this phase as the squares are distracting and can make one lose sight of the big picture. 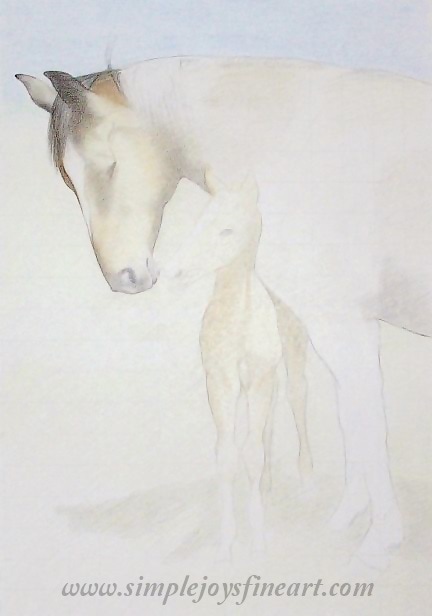 In this image, I'm starting to block in some color. I've got some base colors in and have started to define the shaded areas.  Here, I am continuing to block in color, but you can see my focus has now shifted to the horses' heads, mainly the mare's. I always like to get the heads, particularly the eye areas, done first as this is the most critical part of any painting. If eye and expression are not correct, it won't matter how good the rest of it is! That is what draws people! 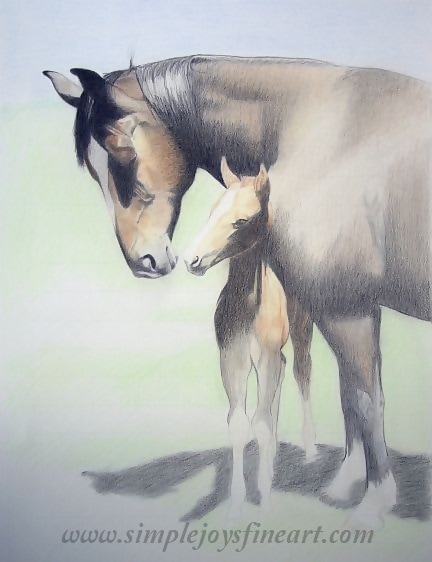 Shadow areas continue to be defined and darkened. This image appears a bit grainy. Part of it is the photo itself, but also because I've been using the side of the pencil on the larger areas to get the color in. It will be smoothed out as I go along! 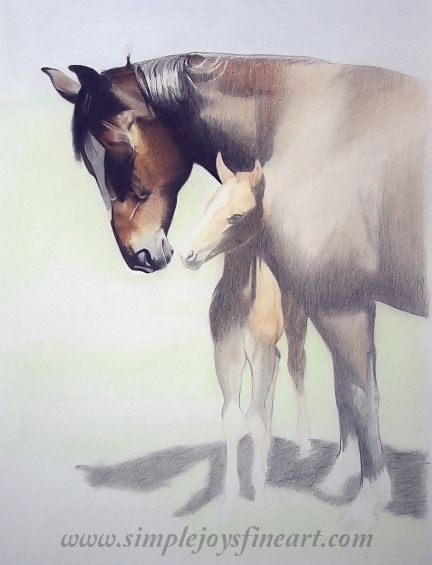 I've returned to the mare's head to further add color and bring out the darks and lights to really make it pop. 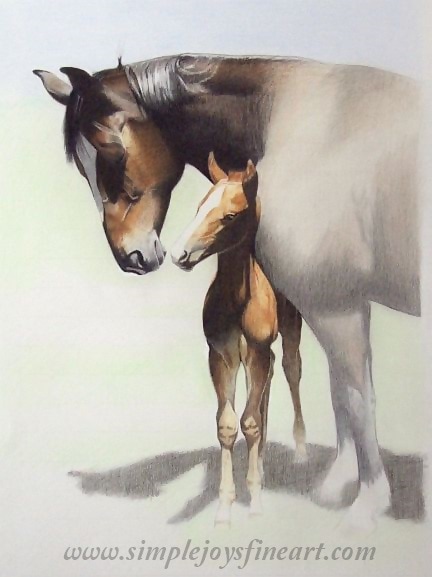 And it's on to the foal! This was the funnest part of the whole piece! I loved seeing this little one coming to life! He also came together easily and I was able to finish him up rather quickly. 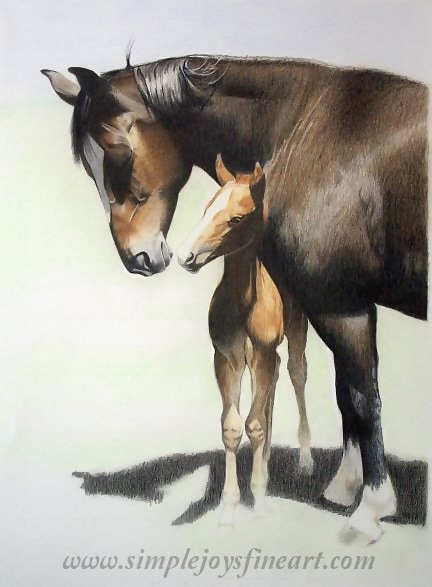 Next was drudgery. Time to fill in the mare's body colors. Larger areas are always harder. You can once again see the grainier look which were smoothed out later on once I knew I had gotten the values right. You can see I have also darkened the shadow on the ground. 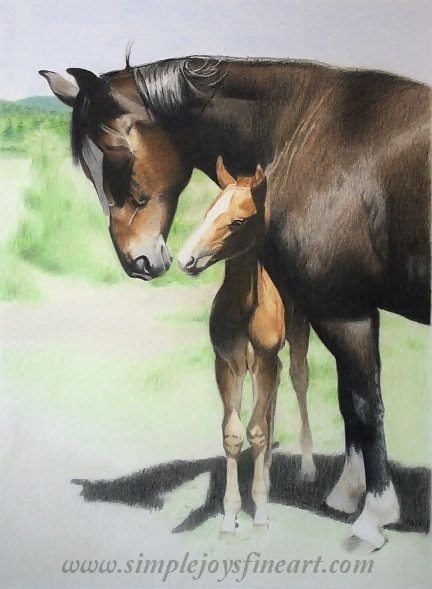 Almost done! My least favorite part is always saved to the end- landscape! I've gotten the greens and ground started blocking in and I've finished the sky.  And it's all done!
The final stage, fine tuning, is actually one of the longest steps. This is the time when I smooth out all the grainy sections and make sure any small dots of paper still showing through are filled. It is also where I work to make sure that my darks are dark and my lights are light! Note how dark the ground shadow has gotten. Fine tuning is taking a piece one step further than done to make sure it looks it's best! This is the time I step away (or leave the studio) and come back the most! Anything that needs more work becomes obvious this way. When it gets to the point that I can't believe I did that, it's done! I hope you found this helpful and I am looking forward to presenting new works in progress! Prints and note cards of "Tender Moment" can be found in the Shop! |
Author
Wendi Gunter is a colored pencil artist living in north-central Idaho with her husband, 5 children, and a menagerie of farm animals and pets. Drawing keeps her sane. Archives
June 2019
Categories |
 RSS Feed